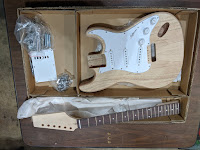
In this post you will see video of me going through the different aspects of the Guitar Kit I am building. I also go through the process of Head-Stock Design.
What skills were integral to completing this task?
- Inventory Kit Parts
- Practice Head-stock Design
What skills were integral to completing this task?
- Need to be thorough on counting your components
- 10 in 20 brainstorming activity (make 10 design attempts in 20 with no judgement)
Reflective component:
- How could you improve this process?
- I would make sure you have parts check list to make sure all parts there
- I would make the design process digital so can using layer and coloring technique in 3D software
- To complete this task you will learn safely how to use these tools and use brainstorming techniques like 10 in 20 to make your design a reality on your guitar.
- It is important to measure twice and cut once making sure you stay away from the no-fly zone areas.
Print Copies of No-Fly Zone template.
https://drive.google.com/file/d/1l2STxsHhMI2j179sHRqEfor_JMwDEq57/view?usp=sharing
 Design the shape you like multiple times.

Pick Favorite and cut out on paper and transfer line to head of the neck of your guitar kit.
Use Band Saw or Coping saw cut the line.
Sand Head of Guitar and back of neck
(DO NOT DAMAGE the NUT, or Frets and Fret Board)
Use your No Fly Zone Template
Please use links below to help you understand how to use different tools
Using Band Saw to Cut Head of Neck
https://photos.app.goo.gl/aTgtExwy6Kcj3VfCA
How to use Band Saw (WITH SAFETY GLASSES!)
https://photos.app.goo.gl/SLSM6CLDrRdmz9xy5
Using a Coping Saw
https://youtu.be/JX8YncGsshU
buying a Coping Saw
https://www.amazon.com/Eclipse-70-CP1R-Handle-Coping-Thickness/dp/B002NH0EC2/ref=sr_1_1?dchild=1&keywords=eclipse+coping+saw&qid=1589320523&sr=8-1
Anatomy of a Guitar and Pricing out Guitar Parts Activity
https://drive.google.com/file/d/1_C3-jz8xuD0tW-bAYioUSnk3JrfJGJn7/view?usp=sharing
https://drive.google.com/file/d/1l2STxsHhMI2j179sHRqEfor_JMwDEq57/view?usp=sharing
 Design the shape you like multiple times.
Pick Favorite and cut out on paper and transfer line to head of the neck of your guitar kit.
Use Band Saw or Coping saw cut the line.
Sand Head of Guitar and back of neck
(DO NOT DAMAGE the NUT, or Frets and Fret Board)
Use your No Fly Zone Template
Please use links below to help you understand how to use different tools
Using Band Saw to Cut Head of Neck
https://photos.app.goo.gl/aTgtExwy6Kcj3VfCA
How to use Band Saw (WITH SAFETY GLASSES!)
https://photos.app.goo.gl/SLSM6CLDrRdmz9xy5
Using a Coping Saw
https://youtu.be/JX8YncGsshU
buying a Coping Saw
https://www.amazon.com/Eclipse-70-CP1R-Handle-Coping-Thickness/dp/B002NH0EC2/ref=sr_1_1?dchild=1&keywords=eclipse+coping+saw&qid=1589320523&sr=8-1
Anatomy of a Guitar and Pricing out Guitar Parts Activity
https://drive.google.com/file/d/1_C3-jz8xuD0tW-bAYioUSnk3JrfJGJn7/view?usp=sharing
* To Improve this activity
I would recommend you do this digitally
I would recommend you do this digitally
use the template in a photoshop based program or can us 3D editor to help create your design
so can render it to see if any issued on all surfaces.
Photopea
https://www.photopea.com/
is free web based program that will let you draw directly on design template
Tinkercad
https://www.tinkercad.com/
is free web based program that will let you draw head-stock shape in 3D
Sketchup
https://app.sketchup.com/app?hl=en
is free web based program that will let you draw head-stock shape in 3D
Fusion 360
https://www.autodesk.com
is free web based program (for schools and students) will let you draw head-stock shape in 3D


No comments:
Post a Comment